четверг, 30 марта 2017 г.

VANE Query Language: Intuitive Access to Satellite Imagery

The traditional market of satellite imagery products is something not easy to communicate with. You have to deeply immerse yourself in the subject of geospatial and remote sensing to realize what kind of products you could get and how it could be used in your particular application. Besides Google Maps and this kind of horizontal platforms, where the satellite images are a part of the map services, there are financial and technological barriers that hold back the market of satellite imagery products being accepted by mass market applications and services developers.
When the satellite market is growing due to a microsatellite technical revolution and appearance of the new private companies (over 1.500 satellites are expected to be launched before 2024), we see more open data, like ESA’s Copernicus program, became available — the cost barriers are going to be less challenging. The goal of VANE™ platform is to remove the technological barriers for application developers and education. 
VANE Query Language for intuitive queries to the data, getting it instantly into application
The SQL fashioned VANE Language concept is to unite all operations with satellite data, like processing and delivery, in one single query.
The typical workflow for satellite product — which means the one for appropriate location and data period — looks like the following:
  • go to a catalog of satellite imagery (for free and publicly available Landsat imagery, one is https://earthexplorer.usgs.gov/, povided by US geological survey)
  • search by predefined criteria manually or through the API, if provided, in order to get the imagery list (the number of scene ID’s) and the metadata
  • download so called Level1 products (in terms of pre-processing, usually in GeoTiff format) by selected ID’s
    NB! Concerning Landsat — after Amazon launched their Landsat on AWS, it’s become more usable to download products by specific bands. At “Openweathermap” we also use Amazon cloud services but as one of the data sources to download Landsat data
  • then you come to data processing either it’s a simple RGB synthesis or an operation to calculate some values like NDVI (vegetation index). Typically for that kind of tasks the data processing software is necessary — usually representing the powerful packages that are superfluous for such kind of operations (not to say too expensive)
  • finalize your workflow by preparing your products for Web — which means transformation into Mercator projection, tiling and uploading to some web server or deploying your products using one of commercial or opensource geo servers software through WMS / TMS export protocols
In VANE Language the workflow mentioned above might look somehow like this:
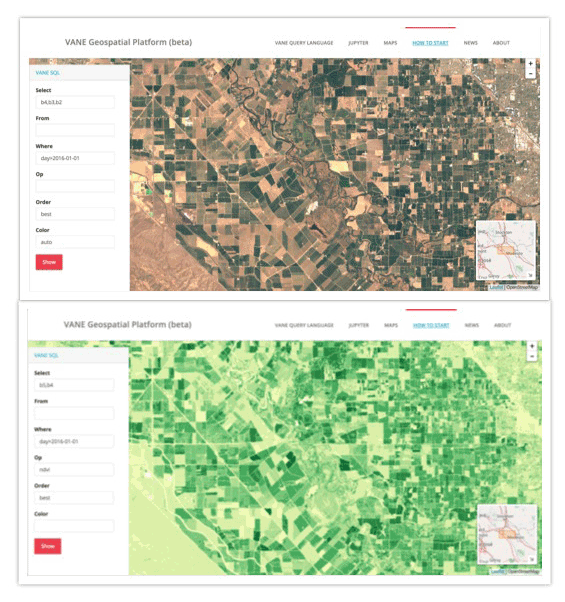
http://{s}.sat.owm.io/sql/{z}/{x}/{y}?select=b4,b3,b2&where=day>2016-01-01&order=best&color=auto
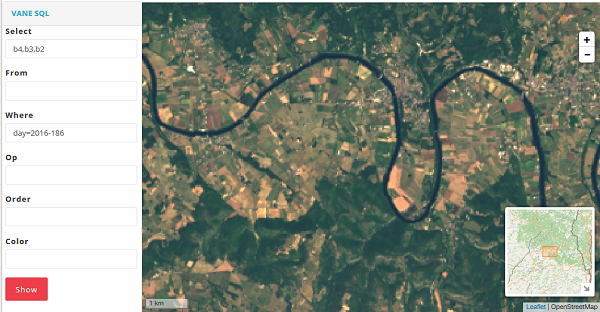
Moreover you can build queries and check them online getting instant visual result with the help of VANE visual tools like SQL-viewer.


What does it promise for now (or for the near future)?
No catalogs:
The one of the ideas of the VANE platform — no need of search by scenes and footprints. It is based on a simple assumption: each location in the world has metadata — click on any location and get information about all pixels containing this location. Such projects as cloudless atlases and Google base satellite maps are created according to this basic principle, stitching best imagery pixels in one seamless mosaic. According to scenes metadata VANE can preliminary compile the best satellite cover — users need to set up a parameter order=best for this operation. Even more, VANE language allows you to set up further requirements for your mosaic, providing appropriate parameters in your query — meaning: no older than (day>{yyyy-mm-dd})… or put all last imagery on the top (order=last)… or within the specific time interval (between({yyyy-mm-dd}:{yyyy-mm-dd}))…
Than you can go further, applying your custom colors to the result mosaic, according to VANE language specification.
No desktop:
Although for deep analysis of satellite images and processing it for expert work, like seamless and tonal-balanced satellite mosaic or training algorithms for change detection, you do need some software and packages, yet most of the typical tasks and algorithms you can apply online. And this is the trend of BigData and SaaS that could hardly being stopped by GIS software vendors.
One query:
With the VANE query language developer sets up all parameters in one query:
  • what kind of data he needs (satellite imagery, weather, sensors)
  • applied processing methods (RGB, NDVI, false colors; any other indices, band combination, custom color scheme etc.)
  • <a result format> (map, tile, JSON data feed etc.) 

VANE analytical tools for online computing and data processing

For such kind of applications and exercises we’ve deployed JUPYTER programming environment with the VANE language implementation.
Jupyter Notebook is a popular open and free tool on Python that combines code, text, and charts, and provides you with the possibility to distribute results to other users. With Jupyter you can play with VANE data such as weather and satellite images and their combination. It is an ultimately convenient tool for data science, experiments with math algorithms and data processing. And of course for education.
Now we can get closer to analytical tasks like change detection — one of the very base for analysis on satellite imagery. This particular example shows how to apply Normalized Burn Ratio Index (NBR) to Landsat to detect wildfire burning footprint for the chosen area.
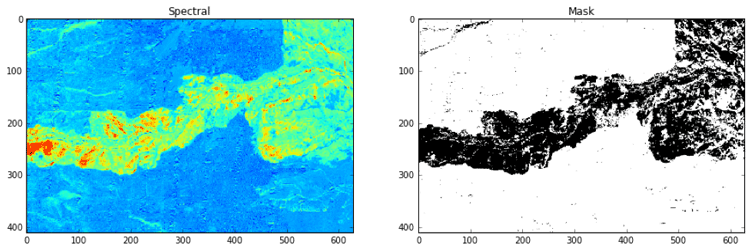


As a result of the exercise you will get a calculated area of burnt land as a resulting difference between two images.
Launching Jupyter on VANE platform under your Openweathermap account you will find all examples in the subdirectory and will be able to create your notebooks for experimental and research tasks with the immediate results that you can later download as a ready-to-publish material or share with your colleagues.

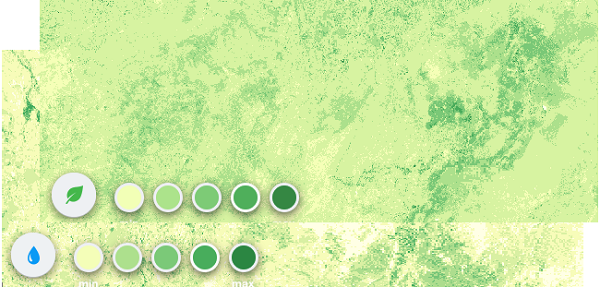
NDVI & NDWI — differences and applications


The world around us is changing constantly. Technologies develop, progress takes its place. However, one thing stays permanent: humans still depend on environment. And partially well-being of people is related to plants. Plants allow people to breathe, plants give us food, shelter, medicaments and many other crucial things. Yet, uncontrolled agriculture, transition to monoculture farming within entire countries, climate change — all these factors have negative effect on vegetation layer. Moreover, human population grows exponentially, and the issue of food supply arises more sharply.
That’s why nowadays there is a steady tendency to preserve what we possess at the moment. And here satellite monitoring over vegetation condition comes to help. Also satellite monitoring facilitates work of farmers and lets decrease costs and losses in case of negative weather phenomena such as floods and drought. Whenever it is an emergency situation or farming planning there is a great helping tool that is satellite imagery which provides a vegetation index (NDVI) and a water index (NDWI).
Let’s consider what they are and how they differentiate.
NDVI — Normalized Difference Vegetation Index


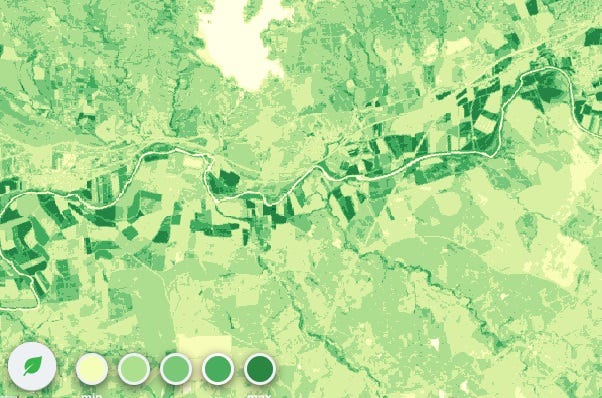
NDVI index on the satellite image


Nowadays it is the most common index of density of vegetation layer. Low values of NDVI (0.1 and less) correspond to vegetation free regions and to stone, sand and snow areas. Moderate index values (0.2–0.3) show presence of bush and meadow vegetation; while high index values (0.6–0.8) denote forests of temperate climate and tropical rainforests.
NDVI is calculated from comparison of visible and near-infrared light reflected from vegetation. A green pigment in leaves that is chlorophyll greatly absorbs visible light (from 0.4 to 0.7 microns) for photosynthesis process. At the same time, structure of cells of leaves greatly reflects near-infrared light (from 0.7 to 1.1 microns). Healthy vegetation absorbs a major part of visible light while it also reflects a larger part of near-infrared light. Unhealthy or scarce vegetation reflects visible light mostly and a lesser part of near-infrared light.
NDVI = (NIR — VIS) / (NIR + VIS)
NDWI Normalized Difference Water Index


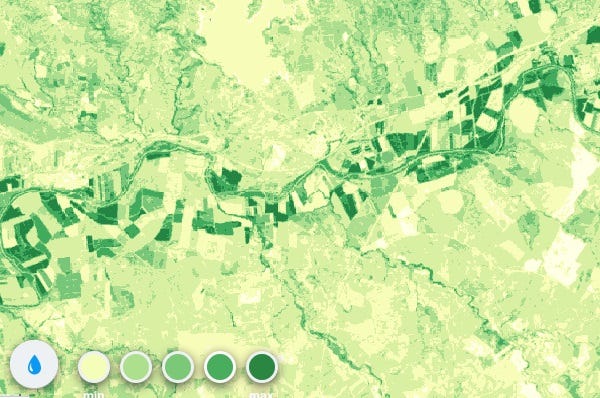
NDWI index on the satellite image

Plant humidity is an important indicator for wildfires monitoring and for defining of possibly dangerous regions. Low humidity contributes to environment susceptible to wild fires, especially it happens in ecosystems where live and dry vegetation coexist.
NDWI in comparison with NDVI is more accurate indicator of plant humidity. NDWI is calculated with the help of water absorption band which is more closely connected with moisture than chlorophyll whose light-absorbing properties are used in calculation of NDVI. During droughts vegetation condition greatly depends on water stress and in this case Normalized Difference Water Index is more useful than chlorophyll-based Normalized Difference Vegetation Index.

понедельник, 16 января 2017 г.

How to know what particular imagery do you get from VANE Geospatial Platform


The one of the ideas of VANE platform — no need of search by scenes and footprints. It is based on a simple assumption: each location in the world has metadata — click on any location and get information about all pixels containing this location. Such projects as cloudless atlases and Google base satellite maps are created according to this basic principle, stitching best imagery pixels in one seamless mosaic. According to scenes metadata VANE can preliminary compile the best satellite cover — users need to set up a parameter order=best for this operation. Even more, VANE language allows you to set up further requirements for your mosaic, providing appropriate parameters in your query — meaning: no older than (day>{yyyy-mm-dd})… or put all last imagery on the top (order=last)… or within the specific time interval (between({yyyy-mm-dd}:{yyyy-mm-dd}))…
Than you can go further, applying your custom colors to the result mosaic, according to VANE language specification.
Just to demonstrate this principle in work we’ve launched a very basic application called Finder.
How it works:


You can follow these particular steps:
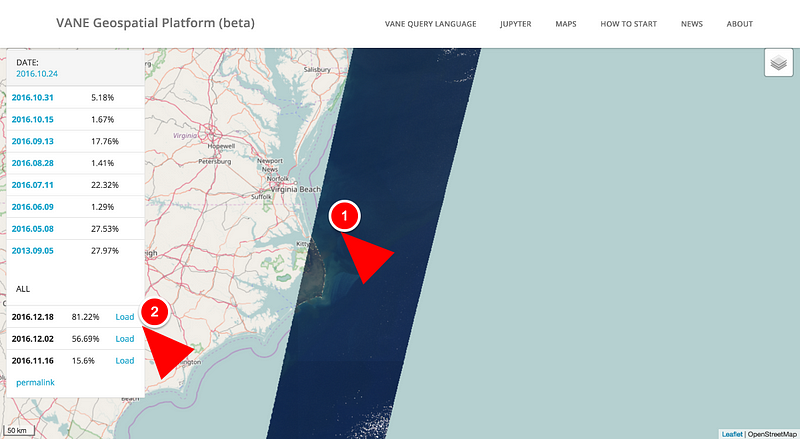
  1. Click any location on the map to get the list of VANE imagery available for this location. All imagery already processed is listed on the top
  2. Whether there is an imagery that has not been processed yet — you can preview the metadata and the quicklook (here we go to the classic catalog workflow) and start the processing by clicking the Load button.
It takes from 10 to 50 minutes for the new image being uploaded and processed.
Don’t hesitate to send us your comments on using the Finder and the VANE platform — we appreciate feedback and look forward to hearing about your particular cases and ideas on using satellite imagery and environmental data.

среда, 14 декабря 2016 г.

Satellite imagery: Landsat 8 and its Band Combinations.


In the current version of VANE Language, we use images from Landsat8 satellite which captures the Earth’s entire surface every 16 days. The satellite makes hundreds of images with a unique name for each one like LC81410552016219LGN00 and a pixel size of 30 meters, each image consists of 11 bands, the size of the uncompressed image is 2 GB.
Landsat 8 Operational Land Imager (OLI) and Thermal Infrared Sensor (TIRS) images consist of nine spectral bands with a spatial resolution of 30 meters for Bands 1 to 7 and 9. New Band 1 (ultra-blue) is useful for coastal and aerosol studies, and also new Band 9 is applicable for cirrus cloud detection. The resolution of Band 8 (panchromatic) is 15 meters. Thermal Bands 10 and 11 provide more accurate surface temperatures and are collected at 100 meters. Approximate scene size is 170 km north-south by 183 km east-west (106 mi by 114 mi).
By default, we get B2, B3, B4, B5, B7, but it is possible to download any other bands.
Landsat 8 Operational Land Imager (OLI) and Thermal Infrared Sensor (TIRS) Launched February 11, 2013
Band 1 — Coastal aerosol, Band 2 — Blue, Band 3 — Green, Band 4 — Red, Band 5 — Near Infrared (NIR), Band 6 — SWIR, Band 7 — SWIR, Band 8 — Panchromatic, Band 9 — Cirrus, Band 10 — Thermal Infrared (TIRS), Band 11 — Thermal Infrared (TIRS)

Let’s consider how these bands and their combinations can be used to visualize Landsat 8 images.

Bands 2, 3, and 4
Blue, green and red spectra combine together for creation of full color images.
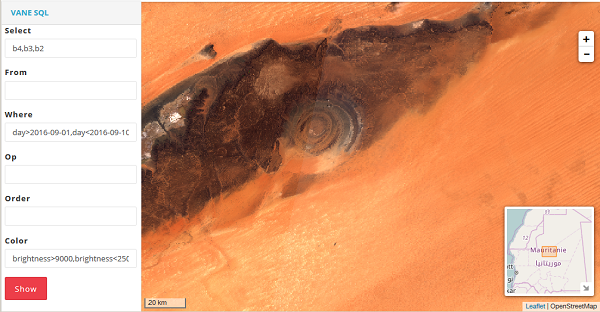
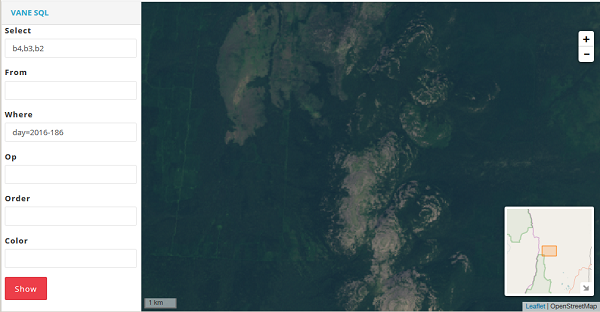
One of the simplest operations is to generate RGB map. Here an image consists of Bands 4–3–2 which correspond to the well-known RGB color model.
image #1


France, a spot near Toulous.

image #2


The Sahara desert.

Band 5
Near Infrared (NIR) — this part of the spectrum is one of the most frequently used as healthy plants reflect it mostly: water in their leaves scatters the wavelengths back into the sky. This information gets useful for vegetation analysis. By matching this band with others, one can get indexes like NDVI, which provide more precise measurement of plant condition comparing with only looking at visible greenness.


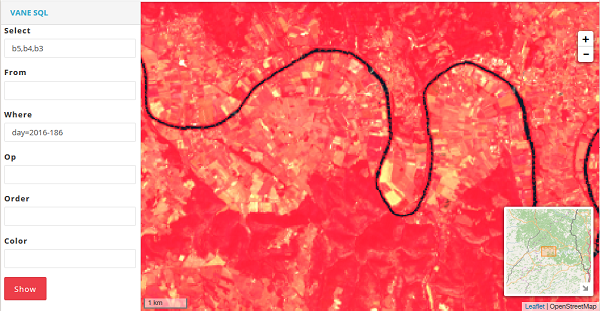
Let’s look at image #1 in the 5–4–3 band combination.

5, 4, 3 — Traditional Color Infrared (CIR) Image
Pay your attention how healthier vegetation beams in red more clearly. This band combination is often used for remote sensing of agricultural, forest and wetlands.
Bands 7 — The Shortwave Infrared (SWIR2)
Spectra Shortwave Infrared let clearly distinguish wet soil from dry one, and also differentiate the earth’s structure: rocks and soils that can look almost similar in other bands have strong distinction in SWIR.


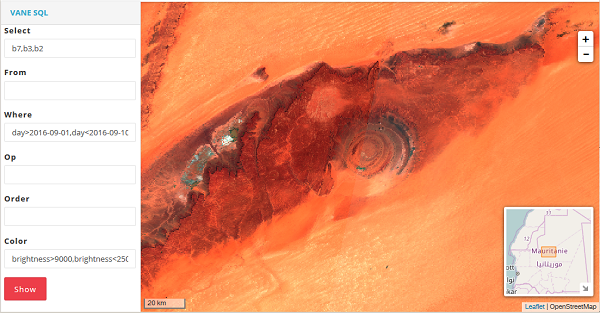
We get the following picture if we take image #2 and use infrared band 7 instead of red band 4.

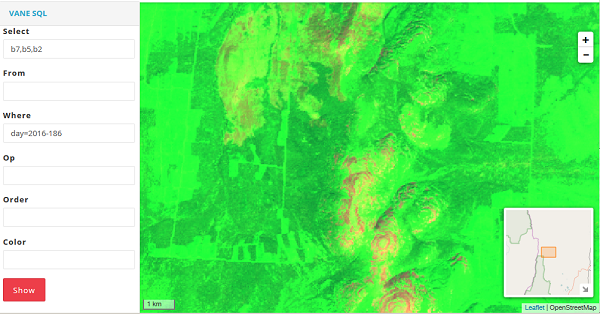
7, 5, 2 — False color image
This band combination is convenient for the monitoring of agricultural crops which are displayed in bright green color. Bare earth is showed in purple color while not cultivated vegetation appears in subtle green.
Compare the image made in essential RGB colors:


And here is the 7–5–2 band combination:


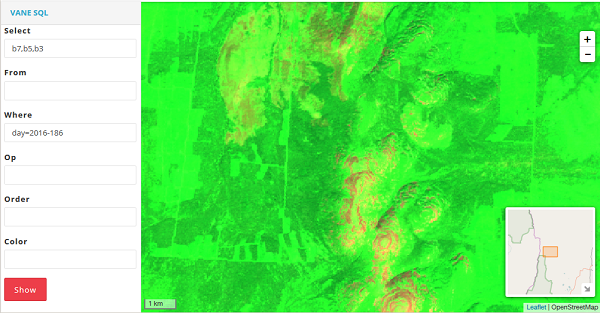
7, 5, 3 — False color image
This false color image shows land in orange and green colors, ice is depicted in beaming purple, and water appears to be blue. This band combination is similar to the 7–5–2 band combination, but the former shows vegetation in more bright shades of green.


среда, 26 октября 2016 г.

Examples of VANE Language: NDVI


The NDVI, i.e. the normalized difference vegetation index, is a simple graphical indicator of biomass active photosynthetically.The NDVI is one of the most common and widely used indexes for evaluation of vegetated areas, their quality and quantity. Using the NDVI it is possible to detect presence of plants, its dynamics of emergence and growth. For getting of this index there is Band 5 which measures the near infrared spectrum, or NIR (Near Infrared). This part of the spectrum is reflected by water in leaves of healthy plants. Maps of the NDVI with dynamics (in various seasons) let tracing peculiar features and deviations of seasonal vegetation.
http://owm.io/sql-viewer?select=b5,b4&where=day=2016-200&op=ndvi&lon=-102.21&lat=34.3264&zoom=12

вторник, 25 октября 2016 г.

How to use OpenWeatherMap UV index


Thank you for the article  Francesco Azzola
 http://www.survivingwithandroid.com
 @survivingwithan
 https://it.linkedin.com/in/francescoazzola

This post describes how to use OpenWeatherMap UV index. This is an interesting API because we can use it to explore some important aspects about Android and location aware API. Openweathermap provides this API for free! As you may already know, Openweathermap provides also a full set of API about weather information: you can get current weather conditions, forecast, historical information and so on. This information is free and we can use Openweathermap API free of charge.
Focusing on this article, at its end, we will build an Android app that gets UV index and show it using Material design guidelines.
Before diving into the app details is useful to have an idea about UV index.
Brief Introduction to UV index
UV index (or Ultraviolet index) is an international standard to measure the ultraviolet radiation at particular place and time.
The purpose of this index is to help people protect themselves from UV radiation. So this index is very important and useful.
The UV radiation is measured using a linear scale proportional to the UV intensity.
It is important, then, to know how to get this information from OWM.
OpenWeatherMap UV Index API
To get the UV Index from OpenWeatherMap, it is necessary to send the current location expressed as latitude and longitude:
http://api.openweathermap.org/v3/uvi/{lat},{lon}/current.json?appid={your-api-key}
and of course, the api-key.
You can the API key creating an account.  This is free and you can use to this link.
If you want to have a UV index at a specific time you can use this API:
http://api.openweathermap.org/v3/uvi/{location}/{datetime}.json?appid={api_key}
where datetime is expressed using ISO 8601. As you can notice, these two API are very simple to use. If you want to have more information you can go to the API doc.
According to the documentation, the JSON response is easy to parse. It looks like:
{
   "time": "2016-03-03T12:00:00Z",
   "location": {
                   "latitude": 40.75,
                   "longitude": -74.25
               },
   "data": 3.11
}
Now we have all the information we need to build our app.
To invoke the OpenWeatherMap API is very simple once we known the current location (latitude and longitude). Let us assume, by now, that we have already the latitude and longitude.
Our Android app has to make an HTTP call to the OpenWeatherMap API and parse the JSON response. (If you want to have more information go to how to invoke Openweathermap API in Android).
As HTTP client library, the app uses OkHttp library, so the build.gradle is:
dependencies {
  ..
  compile 'com.android.support:appcompat-v7:23.2.1'
  compile 'com.android.support:design:23.2.1'
  compile 'com.google.android.gms:play-services:8.4.0'
  compile 'com.squareup.okhttp3:okhttp:3.2.0'
}
Once the dependency is configured, making an HTTP request is very simple:
private void handleConnection(Location loc) {
  double lat = loc.getLatitude();
  double lon = loc.getLongitude();
  // Make HTTP request according to Openweathermap API
  String url = UV_URL + ((int) lat) + "," + ( (int) lon) + "/current.json?appid=" + APP_ID;
  System.out.println("URL ["+url+"]");
  Request request = new Request.Builder()
    .url(url)
   .build();
  httpClient.newCall(request).enqueue(new Callback() {
   @Override
   public void onFailure(Call call, IOException e) {
    // Handle failure in HTTP request
   }
  @Override
  public void onResponse(Call call, Response response) throws IOException {
   // Ok we have the response...parse it
   try {
    JSONObject obj = new JSONObject(response.body().string());
    final double uvIndex = obj.optDouble("data");
    System.out.println("UV Index ["+uvIndex+"]");
    JSONObject jsonLoc = obj.getJSONObject("location");
    final double cLon = jsonLoc.getDouble("longitude");
    final double cLat = jsonLoc.getDouble("latitude");
    Handler handler = new Handler(MainActivity.this.getMainLooper());
    handler.post(new Runnable() {
      @Override
      public void run() {
       // Handle UI Update
      }
     });
  }
  catch(JSONException jex) {
    jex.printStackTrace();
   }
 }
});
}
The final result is shown in the picture below:
image00.png
The color of the value shown in the image above changes according to UV Index scale.
Get current longitude and latitude 
As told before, to get the current UV index, we need to use current location expressed using Latitude and Longitude.
As you may already know Google play services is a set of services that extend the Android app features providing a set of new services like Google Map, Google plus, Location Service and more. Using Google play location services we can build a location aware app.
Google play service setup
The first thing is setting up the Google play location service in build.gradle:
dependencies {
  ..
  compile 'com.google.android.gms:play-services:8.4.0'
  ..
}
Now the library is ready and we can use it in developing our Android app.
Moreover, the Android UV Index app should be aware of the current location so that it can pass the latitude and longitude to the OpenWeatherMap API to get the current UV Index.
We have to develop then a Google play services client to invoke the services exposed by Google play so that the app can retrieve the current location.
Google play location service client
Making the client is very simple and we need just a few lines of code:
private void initGoogleClient() {
     googleClient = new GoogleApiClient.Builder(this)
         .addConnectionCallbacks(this)
         .addOnConnectionFailedListener(this)
         .addApi(LocationServices.API)
         .build();

}
At line 5, we specify we use LocationServices.API. The initGoogleClient is called in onCreate method so that we initialise the Google play location services client as soon as the app starts.
It is important to remember to disconnect the client to the services when the app stops:
@Override
protected void onStop() {
  googleClient.disconnect();
  super.onStop();
}
and to reconnect the client when the app starts:
@Override
protected void onStart() {
  googleClient.connect();
  super.onStart();
}
One more thing before the Google play services is ready, it is necessary to register the app to listen when the connection fails or the connection is ready:
// Connection failure
@Override
public void onConnectionFailed(@NonNull ConnectionResult connectionResult) {
  showErrorMessage();
  return;
}
// Connection established
@Override
public void onConnected(@Nullable Bundle bundle) {
  getUVIndex();
}
The Goolge play services client is ready and as you can notice when the connection is ready the app retrieves the UV Index.
Assembling the location aware app
Finally, it is necessary to grant the permission in the Manifest.xml:
  <uses-permission android:name="android.permission.ACCESS_COARSE_LOCATION"/>
At the end to invoke correctly the UV index API, we can ask the last known location using:
private Location getLocation() {
  try {
    Location loc = LocationServices.FusedLocationApi.getLastLocation(googleClient);
    return loc;
  }
  catch(SecurityException se) {}
    return null;
  }
}
where googleClient is the client we talked about in the previous paragraph.
This method can return null value so the app can register itself for location updates so that it gets informed when the location changes:
LocationRequest req = new LocationRequest();
req.setInterval(60 * 60 * 1000);
req.setPriority(LocationRequest.PRIORITY_BALANCED_POWER_ACCURACY);
LocationServices.FusedLocationApi.requestLocationUpdates(googleClient, req, this);
where the interval is the notification interval. To know more about LocationRequest refer to the official documentation.
Test Location aware app
To test the app, it is necessary to use a simple Android app that returns fake GPS location and enables fake GPS position in your smartphone under the developer section in the configuration menu.
Source code available @github.
(c) http://www.survivingwithandroid.com for OpenWeatherMap